Sunday, 30 December 2012

Tadpole pond

As expected, my kids have been busy playing with the new scooters and toys that Santa brought them for Christmas. On Boxing Day, when they visited their grandparents they came home with a jar of tadpoles from the pond. We knew the poor tadpoles wouldn't be happy to stay in an old coffee jar for long so we set to work to make a temporary pond in our front garden.

We used an old laundry tub.


I dragged our spade out of the shed and dug a hole in the ground. Geez it is hard to make a dent in clay soil! However, I kept going as far as I could so we could hide the ugly plastic bucket a little.


Alex helped fill the tub with water.


Then he took great pleasure pouring the tadpoles into their new home.


Jasmine and Alex walked around our garden gathering flowers, sticks and leaves to decorate the outside of the pond.


So it still looks a little like a laundry tub but thankfully this doesn't seem to bother the kids!

Friday, 21 December 2012

Glue batik


Only four more days until Christmas. Pretty exciting! We made glue batik pillow slips just in time to put them at the end of the kids' beds for Santa to fill on Christmas Eve.

I have great memories making batik fabric at primary school. I have wanted to try this technique with my kids but have been turned off by the potential accidents from using hot wax. So when I came across the idea of batik using glue I knew I had to try it.

I took tips from the blog "That artist woman". She recommended using Elmer's gel glue. I didn't have any so tried using a different water based craft glue. Unfortunately the glue proved so sticky that it didn't come off even after I soaked it for a day. So, I made sure to try it again with Elmer's glue. I found some at a newsagency by chance but also discovered you can buy it on ebay and from Office Works.

Step 1 - Draw pattern on fabric with glue. Don't forget to put a cloth underneath so the glue doesn't seep through the other side. Leave to dry for a day.


Step 2 - Once glue has dried fully, paint over the fabric with watered down paint. We used fabric paint. However, I have read that regular acrylic paint works just as well.


Step 3 - when paint is dry, wash off with soap and warm water. I used a nail brush to make sure all the glue had rinsed off.

Tuesday, 11 December 2012

Santa stop here

The kids and I made some posters as part of our general Christmas decorating mission this month.


I helped outline some words, as requested, on large sheets of butcher's paper. The kids then used their dot marker pens to decorate their posters. We love our dot marker pens. They are mess free and easy to use. If you haven't used these paint pens before, you should check out their website: http://www.dotart.com/


Jasmine tried to copy the words I wrote but she was sitting opposite me so this proved a bit tricky.


We added our posters to our playroom wall, where we had already made some scrapbook paper snowflakes and decorated our shiny green paper Christmas tree.


None of us take after Toulouse Lautrec but at least our efforts are all adding to the Christmas cheer in our house!

Thursday, 6 December 2012

Decorative Christmas Branch

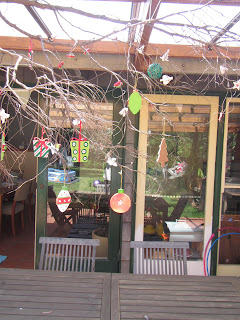
I don't know why but every year as Christmas approaches I feel compelled to go out looking for branches to bring home and decorate. So, despite the crazy heat this week, I wandered down to a nature strip near our house and found a branch that had fallen on the ground. Now that we have a lovely new pergola, this provided the perfect place to string up the branch and start decorating.


The kids helped me choose some Christmas decorations.


I like the way the branch hangs over our outdoor table and adds some extra colour and Christmas cheer.


The birds have also been interested in this new addition to the pergola. 

Monday, 3 December 2012

Christmas t-shirt decorating

I can't believe it is December already. I feel so behind with our Christmas crafts. I had imagined decorating the house from ceiling to floor and outside too this year but somehow we seem to be running out of time. I think we've been indulging in a few too many weekends away!

Anyway, we managed to squeeze in a bit of Christmas t-shirt decorating the other day which was fun. We used our favourite freezer paper stencilling technique - as seen previously on my blog when we turned an old sheet into a cubby house with fabric paint.

Jasmine made a candy cane and Alex a ginger bread man. I drew the outline of the shapes, as requested by the kids, on freezer paper and cut them out with an artline cutter.


I ironed the freezer paper onto the t-shirts. Alex and Jasmine chose their colours and started painting.


I love the colours and patterns they decided on. Once dry, we peeled the paper off.


And tried on the shirts ...


Lastly, I ironed over the painted t-shirts with a piece of cloth on top to seal in the colour.

Monday, 19 November 2012

Melted bead Xmas tree decorations

For our Xmas tree this year we have made some melted bead decorations. I discovered the melting bead technique over at The Artful Parent. We used pony beads which are nice and cheap. Jasmine helped me choose a range of coloured beads and distribute them in our muffin trays - including round, heart and star shaped ones.


We melted the beads in the oven on 180 degrees celsius for about 20 minutes and on the BBQ outside. They were rather smelly but geez we love the result.


Once the melted beads had coolled I pushed them out of the muffin trays and drilled holes in the top of them. I had some silver thread handy so used this to hang the ornaments to the tree.

I love the idea of a Christmas Ornament Exchange instigated by The Imagination Tree, Inspired Family Magazine, Red Ted Art, Mom to 2 Posh Lil Divas. We encourage you to have a look at all the other wonderful hand made Xmas ornament ideas and sign up for the exchange.

Thursday, 15 November 2012

The joy of contact paper

We've experimented with a few different activities using contact paper. It turns out it is fun, versatile stuff!

1. SPARKLY WINDOW DECORATIONS


Most recently, we made sparkly window decorations. Basically we just cut out squares of clear contact paper. We then decorated them using sparkly paper cut outs and foil shapes. We put a second layer of contact over the top with string in the middle so we could hang them up. Jasmine also liked sticking single pieces of decorated contact paper straight onto her bedroom window.


2. DESIGN YOUR OWN STICKERS

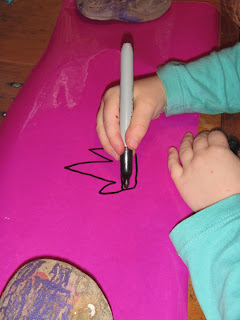
There was something quite satisfying about creating our own pictures with a black marker pen and then peeling them off and decorating with them. For this activity we used pink translucent contact paper.


3. SIMPLE STEPPING STONES

Lastly, something which brought a great deal of laughter to Alex and Jasmine, was the creation of contact stepping stones from their bedroom to the bath. This provided a fabulous distraction from the tedious task of trying to drag them away from playing and into the bath at night. They would walk forwards and backwards along the stepping stones and make up moves for each different coloured spot - including jumping, turning, squeaking etc.

The kids found it hard to trace neat circles on the pink, yellow and orange contact paper so I had to do this and cut them out. However, they were great helpers when it came to sticking them on the floorboards and tiles.


Thursday, 8 November 2012

Turning 5 - kids party games

Alex and Jasmine turned 5 last week. For their birthday party we organised some good old fashioned party games. The kids loved all the craziness, and of course the opportunity to win prizes and eat lollies!

Have a look below for some of the favourite games:

1. I hung marshmallows with string on the clothes line and the kids had to eat them without using their hands. I threaded the string through the marshmallows with a large needle a couple of nights before the party. A rather sticky task. Marshmallow eating was a big hit ... not just a sugar hit ... but a fun challenge too!


2. Next I put a lolly on a plastic plate and covered it in whipped cream. Everyone was given a plate with a cream smothered lolly. The first to lick through the cream and chew up the lolly until finished was declared the winner and given a prize. The messy faces were hilarious.


3. We had a superhero and princess treasure hunt in the garden. I printed out some images from the internet, cut them out and stuck them on paddle pop sticks with tape. I hid them in the garden. The kids could exchange the princesses and superheroes for lollies. In addition, two of the images had gold stars on the back of them and thus attracted an extra prize.


4. We tried a few different activities using a parachute. I was hesistant to use the parachute as I thought the kids had outgrown it but Jasmine was keen to give it a go. It was surprisingly popular. The kids loved bouncing a ball on top of the parachute, running around the outside and underneath it.

Monday, 29 October 2012

Mod podge jewellery tree


I've always struggled to keep my necklaces organised and accessible. My necklaces usually lie tangled in a drawer and seem too hard to untangle on any given day that I would like to wear them. Jasmine's necklaces start off in a jewellery box but within minutes end up scattered across different surfaces of the house. So when I saw a wooden tree at a craft shop I couldn't resist the opportunity to make a jewellery tree for us.

For this activity, I used the following materials:
  • wooden craft tree
  • green acrylic paint
  • paper
  • scissors
  • mod podge
I started out by painting the tree with two coats of green acrylic paint.


Next I cut out some circles from some different sheets of patterned paper. To make the circles consistent I traced around the end of a glue stick.


I stuck the paper circles onto the painted tree using mod podge. I then painted two coats of mod podge over the entire tree to give it a nice smooth finish.


I love the way I can hang Jasmine and my necklaces up so they look pretty and are accessible too.

Friday, 26 October 2012

Bandanna Art for Charity


I was recently contacted with information about a new app called "Bandanna Art" which was launched for CanTeen Australia. Bandanna Art, is an iPhone and iPad app that has been created and developed by Tribal DDB and CanTeen. The world-first app allows people to design a 100% customised bandanna that is then delivered to their door, with all proceeds going to CanTeen.

CanTeen is an Australian organisation that supports and empowers young people living with cancer. Each year, to raise funds and awareness, the organisation holds National Bandanna Day on the 26th October—a day where people show their support by purchasing and wearing a bandanna. However, you can create and purchase bandannas any time to show your support for CanTeen.

Have a look at the website below and download the bandanna app. You can browse a range of bandanna designs created by others or create one yourself.

https://www.bandannaart.com.au/


I created a design and called it "Crunchy red pear" because I've always found something strangely appealing about pictures of pears. The kids made "Alex's lion" and "Jazzy flowers".


The app was free and easy to download and incredibly straight forward to use. I'd love to have a go at creating other fabric like this one day.

In the meantime, I am glad to know that my creation and purchase of bandannas at $20 each will go towards a very worthy cause.