Tuesday, 29 May 2012

Tie dye kids' aprons


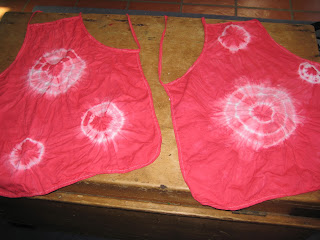
It was time for new kids' aprons in our household. We ordered some plain white aprons from http://www.kidscookingtools.com.au/ via eBay for $10 each, knowing that it would be fun to decorate them ourselves. We debated options such as fabric paint, dye or sewed on pockets. We finally decided on good old fashioned tie dye.We started by gathering bits of the apron together and twisting two or three elastic bands tightly around the fabric.


Next we poured red fabric dye powder into a large pot with five litres of warm water and five table spoons of salt. We had the pot over the stove but didn't actually turn the gas on. It just seemed like an easy place to put the pot. On the dye packet it suggested using a laundry sink instead of a large pot. We poked the fabric under the liquid and stirred it occassionally over a 45 minute period.


Once it looked like the fabric had absorbed a good level of colour, we rinsed the aprons in cold water and hung them on the line to dry. The next day, Jasmine was very excited to peel off the elastic bands and see how the aprons would look.

Friday, 25 May 2012

Erupting playdough volcano


After dinner we made playdough volcanoes. Playdough volcanoes are fun to make. Having them pour out a bubbly lava-like froth provides an extra special element to look forward to. We've been wanting to make a volcano for a while so when I saw on The Artful Parent blog that it was easy, we just had to give it a go.

We made two batches of playdough - one green and one pink - using a no-cook playdough recipe:

2 cups plain flour
1 cup salt
1/2 to 1 cup water
1 tablespoon oil

To make the volcano and lava, take the following steps:

1. Wrap the playdough around a jar or plastic soda bottle.
2. Fill the jar or bottle with warm water and a few drops of red food colouring.
3. Add 2 tablespoons of baking powder
4. Add a few drops of dishwashing liquid
5. When ready for the volcano to erupt, add a tablespoon of white vinegar


Wednesday, 23 May 2012

Home made see-saw


Alex and Jasmine retrieved some left over plastic drain pipe and a board from the rubbish pile we had been making down the side of our house. The rubbish was meant to go out on our next council collection day. However, it appears my children had other ideas. I heard them giggling madly outside. When I came out to see what was the cause of so much fun, I discovered they were trying to make a see-saw. It was very clever of them, though unfortunately not the safest or sturdiest creation.

On the weekend their dad got out his tool box and helped make the see-saw more stable. He started by measuring the board so he could line up the pipe in the middle. The pipe would create a small axis so the children could sit on the board and rock up and down. Next Rod drilled two bits of wood (left over from when he made our gate) on the bottom of the board to hold the pipe in place.


Rod used a handsaw to cut the wood to the right size and then attached them to the board using screws and a drill.


Lastly, Rod cut two more pieces of wood and attached these to the top of the board so Alex and Jasmine could have handles to hold onto. However, standing up on the see-saw seems to be most popular at the moment!


I know our see-saw won't win prizes for appearance. We'll have to think about how to decorate it. I could let the children go crazy with paint or stickers ... hmmmm ... maybe that could be another project to add to our blog. I'll keep you updated.

Saturday, 19 May 2012

Clay - coil pots and pattern making

The kids and I had a fabulous time playing with clay today. It was the kids first time using traditional brown clay and my first time in years. I fondly remember pottery classes at school, making coil pots, vases and statues. Clay is such a satsifying texture to work with. It came in a rectangular block at my local Eckersleys store and wasn't too expensive.

I showed the kids how to make a coil pot by rolling out strips of clay and then sticking them together with the aid of some water and a toothbrush to soften the clay. Of course, Alex loved sloshing the toothbrush in the water and then mashing it into the clay. His hands were coated in brown slime and he was loving it.

Our coil pot was a bit wonky but fun to make. We also experimented with the clay by seeing what other animals and images we could make. Some animals were more easily recognisable than others.


Lastly, we made imprints in the clay using a range of different items from around the house to see what patterns they would make. We then voted on our favourite pattern. We tried shoes, pegs, a tennis racket and ball, leaves, toy cars and motor bikes. My favourite was the peg and Alex's the car tyre. Jazzy was too pre-occupied with her coil pot to cast a vote.


We had so much fun with the clay that we decided to store it in a plastic bag and re-use it another time rather than leaving our objects out to dry.

Wednesday, 16 May 2012

Cardboard castle fit for a knight


My son's collection of knights from our local toy store has been gradually growing. At our last visit to the toy store, the woman behind the counter mentioned that Alex would soon need a castle to house all his knights. Well of course Alex has been talking about a castle ever since!

We decided to use some cardboard boxes and paint and see if we could make a decent castle. Thanks to the ideas over at Inna's Creations we also added toilet paper rolls and this really helped improve the look of our castle.

Start by layering some boxes on top of each other. Then stick them together with masking tape. You can cut out a door or windows if you like. Or alternatively these could be painted on. We opted for one large arched door at the front.


Cut out squares from the top of the toilet paper rolls to make the tower turrets. Again, these can be stuck on the boxes with masking tape.


Choose some paint colours and start painting.


List of materials:
  • Cardboard boxes of varying sizes
  • Toilet paper rolls
  • Scissors
  • Masking tape
  • Paint
  • Paint Brushes

Monday, 14 May 2012

Lovely moon shaped heatie wheaties


I've been wanting to re-cover my kids boring, plain heatie wheaties for ages. When my daughter's curiousity got the better of her, and she tested her scissors on her heatie wheatie to see what was inside, I decided the time for a re-vamp had arrived. I used some fine star-patterned red curdory fabric and then took the following simple steps:
  1. Fold the fabric in half with the coloured side facing each other.
  2. Draw a moon shape (or cloud, heart, star etc) on the fabric with some chalk.
  3. Pin fabric in place and cut out shape.
  4. Sew around edge of shape with sewing machine. The fabric should still have the coloured sides facing each other. Leave about four fingers width unsewn so you can turn the fabric the right way out. I did two rows of stitching around the edge for extra reinforcement.
  5. Once you have sewn around the shape, turn it the right way up.
  6. Pour wheat into the bag using a funnel.
  7. Hand sew hole together.


Enjoy newer, cuter looking heatie wheaties!

Friday, 11 May 2012

Cake in a jar - the perfect gift


Jasmine and Alex helped me make some pink and yellow cakes in jars. We'd heard about cakes in a cup before but had never tried making them. It is their cousin's birthday on the weekend and of course it is mother's day too so we had some great reasons to try out this new activity. We were inspired by the amazing cakes on blogs.babble.com. With so many of us sick this week, we decided to postpone our playgroup catch up.

We used a Betty Crocker lemon cake mix. First, pour the mixture into a bowl, add 60g butter, 2 eggs and 2/3 cup water. Mix with electric beaters. Divide into two batches and stir in food colouring - whatever shade suits your mood. We used yellow and pink.


I had been diligently putting aside jars in my kitchen cupboard, mostly from the kids' jams and honey. These were ideal for today's activity.

Scoop 1/2 cup mixture into a jar and cook in the microwave for 1 to 2 minutes. You don't want to put too much mixture into the jar as it will rise up over the jar and look rather messy. You can probably guess that's what happened to me on my first go.

Take the jar out of the microwave. Be careful not to burn yourself. The jar becomes amazingly hot in such a short period of time. While the cake is cooling, prepare some icing and sprinkles. Following our Betty Crocker theme, we used pre-made vanilla icing and added some pink food colouring to match the cake. Lastly we added some sprinkles.

Don't you think these cakes in a jar look fabulous! What a fun gift. You can also play around with other approaches such as cooking the cakes in jars in the oven. For this method, I believe you put the cakes in a tray of shallow water. Cooking time is more like 40 minutes. Or you can cook the cake in a normal cake tin and then crumble into jars, mixing with cream, icing and sprinkles. Or maybe add jelly too. I think I could become quite addicted to cakes in a jar!

Tuesday, 8 May 2012

Turning my old clothes into kids' costumes

This week the kids and I decided to turn some of my old clothes into new costumes for them. We started with a couple of skirts and singlets. I bought some fancy elastic at Spotlight plus a range of fun iron on motifs, ribbons, sew-on jewels and buttons. There was an insane amount of choice. It was really tricky to restrain myself from spending a crazy amount of money. Luckily I didn't have much time so had to make quick decisions.


For Jasmine, I started out by sewing some elastic shoulder straps on two old skirts so she could wear them as dresses. We played around with the lay out of the jewels and sew-on bits and pieces until we were happy. After the kids went to bed I did the sewing. I know I am not the first person to try and breathe new life into old clothing but it was a fun experience and Jasmine absolutely loves her new costumes so we really wanted to share the results. See the finished dresses below.


Alex was enjoying dressing up and parading in front of the camera.


Alex also requested that I make him a teenage mutant ninja turtle costume. He put on my old green singlet. I used orange felt to tie around him for his waist band and then stapled green felt together for his wrist and ankle bands. We then had a fabulous time pretending to be ninjas and fight off all the "baddies" in our garden. It was a long, energetic adventure that ended with a camp fire on an island where we ate crocodile for dinner and slept soundly in our beds made of leaves.