I recently did a wet felting class at Ikke in Crows Nest. I have always admired felt products but wasn't sure how hard or easy it would be to make them myself. The class was for adults but I knew my daughter would like to try it out too. Thankfully it wasn't too tricky and actually quite therapeutic. So I used my newly acquired skills and knowledge to teach her how to make what we call a "bowl hat". This is because we can't decide if it makes a better bowl or a hat! We used the following materials:
- coloured wool strands (bought from Ikke but also available at Spotlight or on the internet)
- balloon
- bowl
- dishwashing liquid
- synthetic fabric
- scissors.
This is the one I made at Ikke.
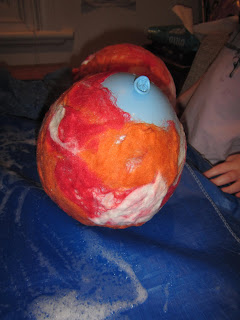
This is the one Jasmine and I made together.
We also made a couple of red, white and orange ones but we were impatient with these ones and they are a bit flimsy. I have definitely learnt that you can't rush the felting process just because you are desperate to see what the final product will look like!
We trialled putting the two flimsy red ones together, adding buttons and a ribbon and using it as a bag.
To make a felted bowl hat or bag yourself, follow the steps below. You can thank the ladies at Ikke for these techniques.
Step 1: Blow up a balloon and rest in a bowl. Use your haand to smear the balloon with dishwashing liquid.
Step 2: Pull apart wool strands and spread out over the balloon. Try to keep the wool even and not let it clump.
Step 3: Pat down periodically with your hands and cover the balloon well. Make sure there are no gaps. The balloon should look like a crazy wig from the 80s. If you want different colours on the outside and inside of the bowl you will have to make two layers of colour. In the pictures below we used the same colour combination inside and out.
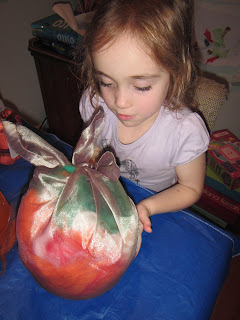
Step 4: Cover the fluffy balloon with synthetic, sheer fabric and turn upside down. Only synthetic, sheer fabrics should be used. The water needs to be able to soak through the fabric. Cotton and other natural fibres are not suitable as these will stick to the felt.
Step 5: You can then add extra wool to the bottom of the balloon if you would like a deeper bowl. Once finished, tie the fabric over the top of the balloon.
Step 6: Put another layer of fabric over the balloon and tie on the opposite side. This will ensure the wool is held in place over the balloon. Add soap and warm water and massage the felt over the balloon. Rub for several minutes. You can dip in hot water to help shrink the felt and aid with the felting process.
Step 7: Remove the sheer fabric. You may need to smooth out some bumps or keep rubbing the felt with soapy water to ensure smooth coverage.
Step 8: Once you are happy with the look of the felt, cut the balloon and remove it. You can then leave the felt to dry. On warm days it will dry in 30 minutes. You can trim the edges if you prefer a straighter finish.
If you are feeling hesistant to try on your own, I would highly recommend doing a class at Ikke. They are great teachers and their store has the most lovely, creative things for sale.


that looks like such a great project, thanks so much for sharing on craft schooling Sunday!
ReplyDelete